“SQL Server Transport Encryption” is a good Google phrase for this technology.
Reference: https://msdn.microsoft.com/en-us/library/ms191192.aspx
|
|
Obtain an SSL Certificate
A self signed certificate is easy and works fine... here’s one way:
-
Get the IIS 6.0 Resource Kit Tools: https://www.microsoft.com/download/en/confirmation.aspx?id=17275
-
All you'll need is the "SelfSSL.exe" tool so the custom install is minimal.
-
Find SelfSSL.exe in default install path: C:Program FilesIIS Resources
-
Good reference for SelfSSL usage: https://www.sslshopper.com/article-how-to-create-a-self-signed-certificate-in-iis-7.html, scroll down to "Generate a Self Signed Certificate with the Correct Common Name"
-
Command line example:
-
SelfSSL /N:CN=MWR-TRO-V2 /V:1999999
-
The /V: part is the validity duration of your cert, in days. I believe 1999999 is the max, which corresponds to around 5475 years in the future (that ought'a last ya ;)
-
The /N:CN= part is the “Common Name” this cert will be tied to… in this case that needs to be the true machine name of your database server.
-
“Do you want to replace the SSL settings for site 1 (Y/N)?” => No
-
Now you have a cert registered in your “personal certificate store” – next we’ll extract it for installation on db server.
|
|
Fire up the MMC “Certificates Console” to manage your new cert </p>
-
Good reference: https://support.microsoft.com/kb/276553)
-
Open the MMC console: Start > Run > mmc [enter] (or Windows-R) (MMC Fig.1)
-
Add the cert snapin: click File > Add/Remove Snap-in (MMC Fig.2)
-
select Certificates under Available snap-ins… and hit Add button… (MMC Fig.3)
-
select Computer Account… then Next… (MMC Fig.4)
-
select Local computer, and then Finish… (MMC Fig.5)
-
lastly, hit OK (MMC Fig.6)
-
You may wish to save this MMC configuration for future convenience (MMC Fig.7)
|
Screenshots...</p>
|
Export the cert as a pfx file
…to be installed on your database server
-
Certs installed via the above process will be your "Personal > Certificates" folder (Export Fig.1)
-
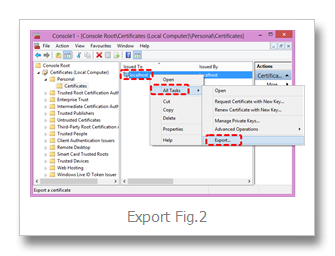
Right mouse desired certifcate > All Tasks > Export > Next ... (Export Fig.2)
-
“Export the private key?” => Yes … Next… (Export Fig.3)
-
Select PFX format, "Include all certs...", "Export extended", NOT “Delete…”, Next … (Export Fig.4)
-
Enter a password, hit Next… (Export Fig.5) – ** REMEMBER THAT PASSWORD **
-
Save the pfx file (Export Fig.6)
-
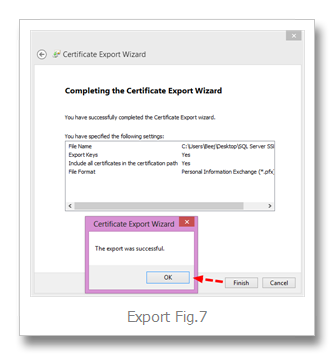
Finish… OK (Export Fig.7)
|
Screenshots...</p>
|
Import cert on database server
-
Login to your DB server desktop
-
Launch MMC Cert Console same as above
-
Go to Personal > Certs
-
Right mouse All Tasks > "Import"… (Import Fig.1)
-
Next… (Import Fig.2)
-
Browse… (Import Fig.3)
-
Next … (Import Fig.4)
-
Enter Password, select “Mark this key as exportable”, Next… (Import Fig.5)
-
“Place all certificates in the following store” => Personal… Next… (Import Fig.6)
-
Finish (Import Fig.7)
|
Screenshots...</p>
|
Activate SSL encryption on DB server
-
Fire up SQL Server’s Network Configuration Utility
-
Start > All Programs > Microsoft SQL Server {version} > Configuration Tools > SQL Server Configuration Manager"
-
then under "SQL Server Network Configuration"
-
Right click "Protocols for MSSQLServer"
-
select "Properties"
-
set "Flags tab > Force Encryption" to Yes
-
and select the installed cert on the "Certificates" tab
-
voila!
-
STOP AND RESTART THE SQL SERVER SERVICE
-
login to the instance with an SSMS Query window
-
fire this command to verify all connections are encrypted:
-
SELECT encrypt_option, * FROM sys.dm_exec_connections WHERE session_id = @@SPID
-
Tip: SP_WHO2 is handy for obtaining spids
|
|


